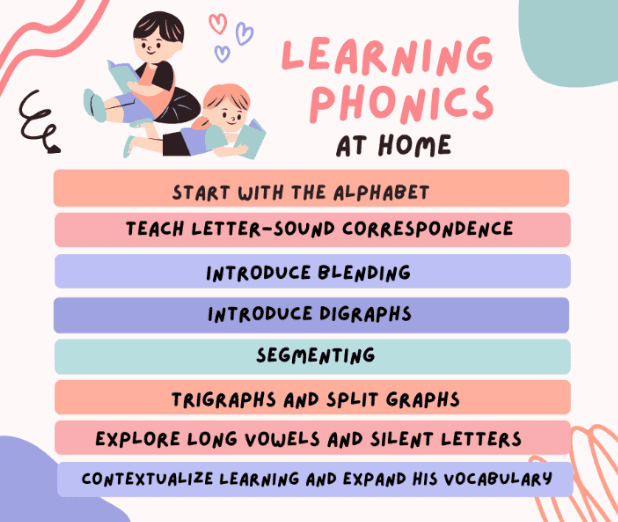
Teaching phonics at home doesn’t require a teaching degree—just patience, consistency, and the right approach. Whether your child is just starting to recognize letters or is already blending sounds, this step-by-step guide will help you build their reading skills effectively.
Why Phonics Matters
Phonics is the foundation of reading. It teaches kids the relationship between letters and sounds, helping them decode words independently. Research shows that systematic phonics instruction significantly improves reading fluency and comprehension—especially in early learners.
Step 1: Start with Letter Sounds (Not Just Letter Names)
Many parents begin by teaching the alphabet song, but letter sounds are far more important for reading.
Focus on phonemes first. Instead of just saying “A is for apple,” emphasize the sound: “/a/ like apple.”
– Use lowercase letters first since most text is in lowercase.
– Introduce 2-4 sounds per week to avoid overwhelming your child.
Pro Tip: Use tactile activities like tracing letters in sand or forming them with playdough to reinforce learning.
Step 2: Teach Blending (Combining Sounds)
Once your child knows a few letter sounds, they can start blending them into simple words.
– Start with CVC words (consonant-vowel-consonant): cat, sit, dog.
– Use successive blending: Say each sound separately (/c/…/a/…/t/) then speed up to form the word (“cat”).
– Try word families (rhyming words): -at (cat, bat, hat), -ig (pig, dig, wig).
If your child struggles: Use counters or blocks to represent each sound, sliding them together as they blend.
Step 3: Introduce Digraphs and Sight Words
After mastering single-letter sounds, move to:
– Digraphs (two letters, one sound): sh, ch, th, wh, ck.
– Sight words (high-frequency words that don’t follow phonics rules): the, was, said. Teach these through repetition and games like flashcard races.
Step 4: Progress to Long Vowels and Complex Patterns
Once short vowels are solid, introduce:
– Silent E (Magic E): Changes “cap” to “cape.”
– Vowel teams: ee, ea, ai, oa.
– R-controlled vowels: ar, er, ir, or, ur.
Keep it fun: Use decodable books that match their skill level so they experience success.
Step 5: Practice, Practice, Practice (But Make It Fun!)
Repetition is key, but drills can get boring. Keep engagement high with:
– Phonics games: Word bingo, scavenger hunts, or apps like Teach Your Monster to Read.
– Reading together daily: Alternate pages, ask questions, and celebrate progress.
– Writing practice: Encourage spelling words phonetically (even if imperfect).
Common Mistakes to Avoid
1. Moving too fast – Mastery takes time. Revisit sounds if needed.
2. Ignoring multisensory learning – Kids learn best when they see, hear, and touch letters.
3. Skipping decodable books – These reinforce phonics rules without overwhelming kids.
Final Thoughts
Teaching phonics at home is a marathon, not a sprint. Celebrate small wins, stay patient, and adjust your approach based on your child’s needs. With consistency and encouragement, you’ll be amazed at their progress!
Need resources? Check out free printables from Starfall* or *Phonics Play, or grab a phonics workbook for structured practice.
—
FAQs: Teaching Phonics at Home
1. What is phonics, and why is it important?
Phonics is a method of teaching reading by correlating sounds with letters or letter groups. It’s crucial because it helps children decode words independently, building a strong foundation for literacy.
2. At what age should I start teaching phonics?
Begin around ages 3–4 with simple letter sounds (e.g., /a/ as in “apple”). Formal phonics instruction typically starts at age 5–6, but follow your child’s interest and readiness.
3. Do I need teaching experience to teach phonics at home?
No! Many phonics programs (like Jolly Phonics or Hooked on Phonics) provide step-by-step guides for parents. Consistency and patience matter more than a teaching background.
4. What are the best resources for teaching phonics?
Free: Starfall, PhonicsPlay, YouTube channels like Alphablocks.
Paid: Bob Books, Explode the Code, or apps like Reading Eggs.
DIY: Flashcards, letter magnets, and homemade word games.
5. How long should a phonics lesson last?
Keep sessions short (10–15 minutes daily) for young learners. Focus on fun, interactive activities to maintain engagement.
6. My child struggles with blending sounds. What should I do?
Try:
Tactile methods: Tap out sounds with fingers or blocks.
Start small: Blend 2-letter words (e.g., “at,” “in”) before longer words.
Use visuals: Point to letters while sounding them out slowly.
7. How can I make phonics fun?
Games: “I Spy” with letter sounds, scavenger hunts for objects starting with /b/.
Songs: Use rhymes or actions (e.g., “The A says /a/, the A says /a/, every letter makes a sound…”).
Arts & crafts: Create letter-shaped cookies or draw sound-related pictures.
8. Should I correct every mistake immediately?
Gently guide corrections but avoid interrupting fluency. For example, if they read “cat” as “cot,” say, “Almost! Let’s try blending /c/ /a/ /t/ together.”
9. How do I know if my child is progressing?
Look for:
Recognizing letter sounds consistently.
Blending simple words without help.
Attempting to read unfamiliar words using phonics rules.
10. What if my native language isn’t English?
Focus on English letter sounds (some may not exist in your language). Use bilingual flashcards or apps to bridge gaps, but prioritize English sound practice.


